
Why Plants Are Nature’s Ultimate Food Factories
Have you ever wondered how a tiny seed can grow into a massive tree without ever visiting a supermarket? Unlike us humans who need to hunt, gather, or shop for food, plants have mastered the ultimate life hack-they make their own food from thin air, water, and sunlight!
Imagine if you could stand in the sun for an hour and create your lunch from carbon dioxide and water. Sounds like science fiction, right? But this is exactly what millions of plants do every single day through a process called photosynthesis.
In this comprehensive guide to IGCSE Biology Topic 6: Plant Nutrition, we’re going to unlock the secrets of how plants feed themselves. Whether you’re preparing for your Cambridge 0610 exam or simply curious about the green world around you, this guide will transform complex biology into concepts you’ll never forget.
By the end of this post, you’ll understand:
- How photosynthesis works (in a way that actually makes sense!)
- Why leaves are shaped the way they are
- What happens when plants don’t get enough minerals
- How to ace your exam questions on this topic
Let’s dive in!
1: Understanding Photosynthesis – The Ultimate Energy Conversion
What Exactly Is Photosynthesis?
Think of photosynthesis as nature’s solar panel system. Just as solar panels convert light energy into electrical energy, plants convert light energy into chemical energy stored in glucose (sugar). This process is so fundamental to life on Earth that without it, you wouldn’t be reading this right now—because you wouldn’t exist!
Simple Definition: Photosynthesis is the process by which green plants synthesize carbohydrates (mainly glucose) from raw materials using energy from light.
The Magic Formula: Photosynthesis Equation
Here’s the equation you absolutely must know for your IGCSE exam:
Word Equation:
Carbon dioxide + Water → Glucose + Oxygen
         (in the presence of light and chlorophyll)
Chemical Equation:
6CO₂ + 6H₂O → C₆H₁₂O₆ + 6O₂
         (light energy, chlorophyll)
Memory Tip: Think “Cows Will Graze Outside” = Carbon dioxide, Water → Glucose, Oxygen
Where Does Photosynthesis Happen?
Photosynthesis takes place in chloroplasts-tiny green organelles found mainly in leaf cells. Here’s what makes chloroplasts so special:
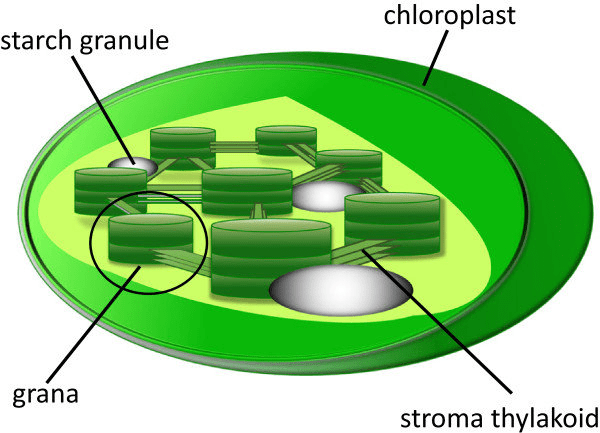
Key features of chloroplasts:
- Double membrane structure: Outer and inner membranes control what enters and exits
- Grana: Stacks of disc-like structures called thylakoids where light energy is captured
- Chlorophyll: The green pigment that absorbs light energy (mainly red and blue light)
- Stroma: The fluid-filled space where glucose is synthesized
Real-life connection: Ever noticed how plants in darker rooms look pale and yellowish? That’s because they produce less chlorophyll when light is limited, making them less green!
Breaking Down Photosynthesis: The Two Stages
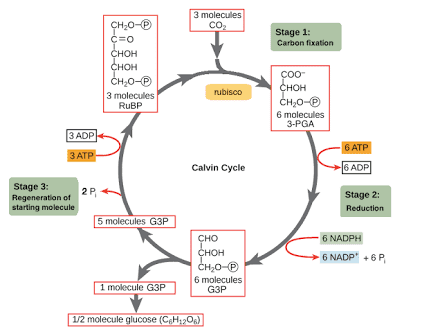
While IGCSE doesn’t require you to know the detailed biochemistry, understanding that photosynthesis happens in two main stages helps:
- Light-dependent reactions (in the grana): Light energy is captured and used to split water molecules, releasing oxygen as a by-product.
- Light-independent reactions (in the stroma): Carbon dioxide is combined with hydrogen to form glucose using the energy from stage 1.
Analogy: Think of it like making a sandwich:
- Stage 1: You gather energy (by getting ingredients from the fridge)
- Stage 2: You use that energy to assemble the sandwich (combining ingredients into food)
2: The Leaf – A Photosynthesis Powerhouse
Why Leaves Are Perfectly Designed
Leaves aren’t just randomly shaped green things-they’re engineering marvels optimized for photosynthesis over millions of years of evolution. Let’s explore their incredible adaptations.
Detailed Leaf Structure
| Leaf Structure | Function | How It Helps Photosynthesis |
|---|---|---|
| Cuticle | Waxy waterproof layer | Reduces water loss while allowing light through |
| Upper Epidermis | Transparent protective layer | Protects inner cells and lets light through |
| Palisade Mesophyll | Tightly packed column-shaped cells | Packed with chloroplasts to maximize light absorption |
| Spongy Mesophyll | Loosely arranged rounded cells | Air spaces allow gas exchange (CO₂ in, O₂ out) |
| Vascular Bundle | Contains xylem and phloem | Transports water (xylem) and glucose (phloem) |
| Lower Epidermis | Protective bottom layer | Contains stomata for gas exchange |
| Stomata | Tiny pores (openings) | Allow CO₂ to enter and O₂ to leave |
| Guard Cells | Kidney-shaped cells around stomata | Control stomata opening/closing |
Brilliant Adaptations of Leaves
1. Broad and Flat Shape
- Large surface area captures maximum sunlight
- Like a solar panel positioned to catch the most light
2. Thin Structure
- Short diffusion distance for gases
- Light can penetrate to inner cells
- Gases don’t have far to travel
3. Palisade Mesophyll Position
- Located at the top of the leaf (near light source)
- Cells are tall and tightly packed
- Packed with chloroplasts-maximum photosynthesis factory space!
4. Network of Veins
- Xylem vessels bring water and minerals from roots
- Phloem vessels transport glucose away to other parts
- Provides structural support (like the skeleton of the leaf)
5. Stomata Location
- Mostly on the lower surface (why?)
- Less water loss (lower surface is cooler and shadier)
- Protected from intense direct sunlight
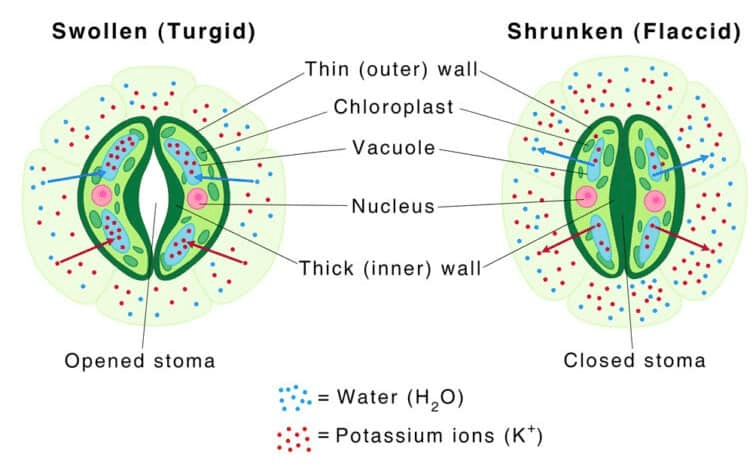
6. Guard Cell Mechanism
- Guard cells become turgid (swollen) when water enters → stomata open
- Guard cells become flaccid (limp) when water leaves → stomata close
- This prevents excessive water loss while still allowing gas exchange
Why Most Stomata Are on the Lower Surface
This is a classic exam question! Here’s the reasoning:
- Reduces water loss: The lower surface receives less direct sunlight, so it’s cooler and has less evaporation
- Protection from rain: Water droplets can block stomata, preventing gas exchange
- Dust protection: Upper surface catches more dust particles that could clog stomata
- Efficient gas exchange: CO₂ concentration is often higher near the ground
Common Mistake to Avoid: Don’t say “all stomata are on the lower surface”- some plants have stomata on both surfaces, and aquatic plants may have them only on the upper surface!
3: Limiting Factors of Photosynthesis
What Is a Limiting Factor?
A limiting factor is anything in short supply that prevents photosynthesis from occurring at its maximum rate. Think of it like baking a cake-if you run out of eggs, it doesn’t matter how much flour, sugar, or butter you have; you can’t make more cakes until you get more eggs!
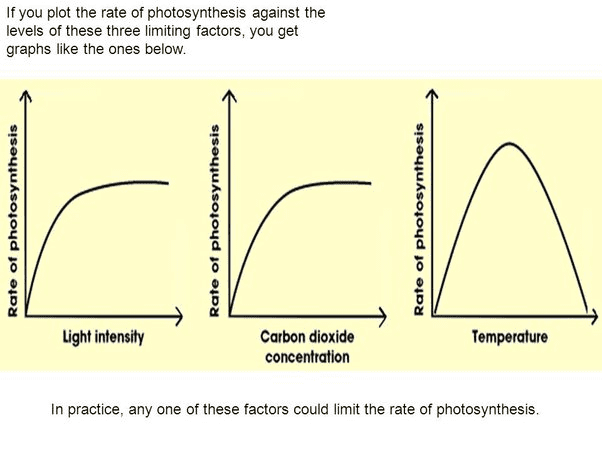
The Three Main Limiting Factors
1. Light Intensity
How it affects photosynthesis:
- At low light intensity: Rate of photosynthesis is slow (not enough energy to drive reactions)
- As light intensity increases: Rate increases proportionally
- At very high light intensity: Rate plateaus (light is no longer the limiting factor)
Real-world example: Plants in a dark room grow slowly, but moving them to a sunny windowsill dramatically increases their growth rate-until another factor becomes limiting.
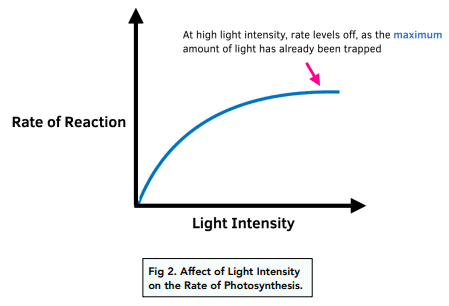
Exam tip: When asked to explain a graph plateau, always state what the NEW limiting factor is (e.g., “Light is no longer limiting; now CO₂ concentration or temperature is limiting the rate”).
2. Carbon Dioxide Concentration
How it affects photosynthesis:
- CO₂ is a raw material for photosynthesis
- Normal atmospheric CO₂ is about 0.04% (quite low!)
- Increasing CO₂ concentration increases the rate of photosynthesis
- Above certain levels, CO₂ is no longer limiting
Interesting fact: Commercial greenhouses often pump extra CO₂ to increase crop yields!
3. Temperature
How it affects photosynthesis:
- Photosynthesis involves enzymes
- Enzymes have an optimum temperature (usually around 25-35°C for most plants)
- Below optimum: Enzyme activity is slow (molecules have less kinetic energy, fewer collisions)
- At optimum: Maximum rate of photosynthesis
- Above optimum: Enzymes begin to denature (change shape permanently), rate drops dramatically
Memory Tip: Think “Too Extreme Destroys” = Temperature Enzyme Denaturation
Understanding Limiting Factor Graphs
This is SUPER important for exams! When you see a graph:
Section A (Steep rise): The factor on the x-axis IS the limiting factor
Section B (Plateau): The factor on the x-axis is NO LONGER the limiting factor; something else is now limiting
Exam Strategy: Always identify:
- What is limiting in each section of the graph?
- What would happen if you changed another factor?
Example Exam Question Approach:
“The graph shows that initially, light intensity is limiting the rate of photosynthesis. After point X, light is no longer the limiting factor, and either CO₂ concentration or temperature is now limiting the rate.”
4: Mineral Nutrition – The Hidden Nutrients
Why Plants Need Minerals
While photosynthesis produces glucose (the plant’s energy source), plants also need minerals for healthy growth. These minerals are absorbed from the soil through roots, dissolved in water.
Important distinction:
- Photosynthesis = making food (glucose)
- Mineral uptake = obtaining essential nutrients for various functions
Key Minerals for Plant Growth
| Mineral | Form Absorbed | Function in Plants | Deficiency Symptoms |
|---|---|---|---|
| Nitrogen (N) | Nitrate ions (NO₃⁻) or Ammonium ions (NH₄⁺) | • Making proteins • Making DNA • Making chlorophyll • Overall growth | • Stunted growth • Older leaves turn yellow (chlorosis) • Particularly affects older leaves first |
| Phosphorus (P) | Phosphate ions (PO₄³⁻) | • Making DNA and RNA • Making cell membranes • Respiration (ATP) • Root development | • Poor root growth • Purple/red tints on leaves • Reduced flowering and fruiting |
| Potassium (K) | Potassium ions (K⁺) | • Enzyme activation • Protein synthesis • Photosynthesis • Water balance regulation | • Yellow-brown edges on leaves • Weak stems • Poor fruit and flower development |
| Magnesium (Mg) | Magnesium ions (Mg²⁺) | • Essential part of chlorophyll molecule • Enzyme activation | • Yellowing between leaf veins (interveinal chlorosis) • Usually affects older leaves first |
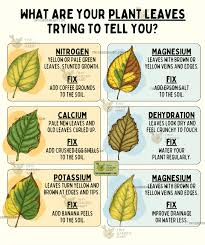
Why Deficiency Symptoms Often Start in Older Leaves
This is a fantastic exam question topic! Here’s why:
- Mobile minerals (like nitrogen and magnesium) can be moved from older leaves to new growing areas
- The plant “sacrifices” older leaves to support new growth
- Therefore, deficiency symptoms appear in older leaves first
Exam Tip: If asked about nitrogen deficiency, mention that “older leaves turn yellow first because nitrogen is mobile and can be translocated to younger leaves.”
How Plants Absorb Minerals
Plants absorb minerals through active transport in root hair cells. This is different from water absorption (osmosis):
- Active transport: Requires energy (ATP from respiration)
- Minerals move against concentration gradient (from low concentration in soil to high concentration in root)
- This is why roots need oxygen for respiration-no oxygen = no energy = no mineral uptake!
5: Uses of Glucose from Photosynthesis
What Happens to the Glucose?
Plants don’t just make glucose and leave it sitting around! They use it for various purposes:
1. Respiration
- Releases energy for all life processes
- Happens in all cells, all the time
- Equation: C₆H₁₂O₆ + 6O₂ → 6CO₂ + 6H₂O (+ energy)
2. Converted to Starch for Storage
- Starch is insoluble (doesn’t affect osmosis)
- Stored in roots, stems, seeds, and leaves
- Can be converted back to glucose when needed
- Test for starch: Iodine solution turns blue-black
3. Making Cellulose
- Used to build cell walls
- Provides structural support
- Makes plants rigid and strong
4. Making Proteins
- Glucose + Nitrate ions → Amino acids → Proteins
- Used for growth, enzymes, and cell repair
5. Making Fats and Oils
- Stored in seeds and fruits
- Energy-rich food store for germination
6: Investigating Photosynthesis – Practical Skills
Experiment 1: Testing a Leaf for Starch
This is a classic required practical!
Aim: To demonstrate that starch is produced during photosynthesis
Method:
- Destarch a plant by keeping it in the dark for 48 hours
- Expose the plant to light for several hours
- Remove a leaf and kill it by placing in boiling water
- Place leaf in hot ethanol to remove chlorophyll (makes it easier to see color change)
- Rinse leaf in water to soften it
- Add iodine solution
- Observe color change
Results:
- Blue-black color = Starch present (photosynthesis occurred)
- Orange-brown color = No starch (photosynthesis didn’t occur)
Safety Note: Ethanol is highly flammable-heat it using a water bath, NOT directly over a flame!
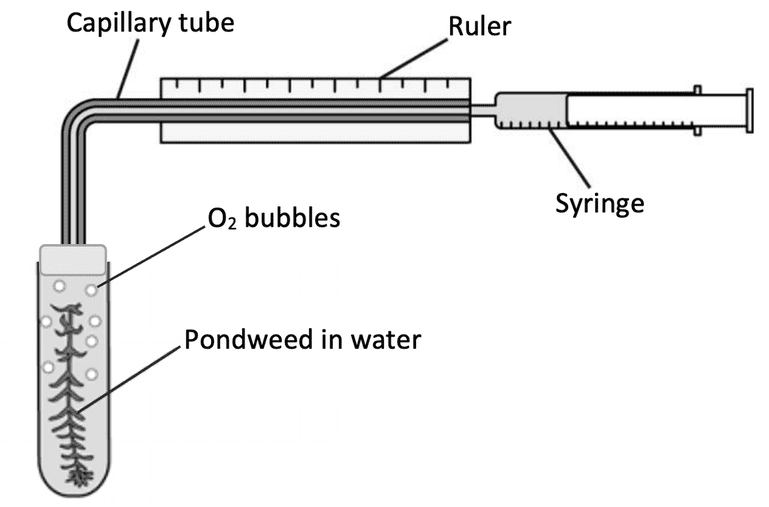
Experiment 2: Investigating Limiting Factors
Using aquatic plants (like pondweed/Elodea):
To investigate light intensity:
- Place pondweed at different distances from a light source
- Count oxygen bubbles produced per minute
- Result: Rate of photosynthesis decreases as distance increases (inverse square law)
To investigate CO₂ concentration:
- Add different concentrations of sodium hydrogencarbonate (provides CO₂)
- Count oxygen bubbles produced per minute
- Result: Rate increases with CO₂ concentration, then plateaus
Control variables: Temperature, light intensity (when testing CO₂), same plant species, same length of pondweed, same volume of water
Key Formulas & Equations Box
Essential Equations to Memorize:
1. Photosynthesis (Word Equation):
Carbon dioxide + Water → Glucose + Oxygen2. Photosynthesis (Chemical Equation):
6CO₂ + 6H₂O → C₆H₁₂O₆ + 6O₂
(light energy, chlorophyll)
3. Respiration (for comparison):
Glucose + Oxygen → Carbon dioxide + Water (+ energy)
C₆H₁₂O₆ + 6O₂ → 6CO₂ + 6H₂ONotice: Photosynthesis and respiration are opposite processes!
Quick Revision Notes
Photosynthesis Summary:
✓ Process where plants make glucose from CO₂ and water using light energy
✓ Occurs in chloroplasts containing chlorophyll
✓ Produces oxygen as a by-product
✓ Energy from light is converted to chemical energy in glucose
Leaf Adaptations:
✓ Broad and flat = large surface area for light
✓ Thin = short diffusion distance
✓ Palisade cells at top = packed with chloroplasts
✓ Stomata = gas exchange (mostly on lower surface)
✓ Guard cells = control stomata opening
Limiting Factors:
✓ Light intensity – more light = faster rate (until plateau)
✓ CO₂ concentration – more CO₂ = faster rate (until plateau)
✓ Temperature – optimum temperature = fastest rate; too high = enzymes denature
Mineral Nutrition:
✓ Nitrogen (nitrates) → proteins, chlorophyll, DNA
✓ Deficiency: yellow leaves, stunted growth
✓ Phosphorus (phosphates) → DNA, membranes, ATP
✓ Deficiency: purple leaves, poor roots
✓ Potassium (K⁺) → enzyme activation, photosynthesis
✓ Deficiency: yellow leaf edges
✓ Magnesium (Mg²⁺) → chlorophyll
✓ Deficiency: yellow between veins
Uses of Glucose:
✓ Respiration → energy
✓ Starch → storage
✓ Cellulose → cell walls
✓ Proteins → growth (with nitrates)
✓ Fats/oils → seeds
Common Mistakes to Avoid
Mistake 1: Confusing Photosynthesis and Respiration
✓ Remember:
- Photosynthesis = making food (requires light)
- Respiration = releasing energy (happens all the time, in all organisms)
Mistake 2: Saying “Plants Breathe in CO₂”
✓ Correct: Plants take in CO₂ for photosynthesis (not breathing/respiration). For respiration, plants take in oxygen, just like us!
Mistake 3: Thinking Photosynthesis Only Happens During the Day
✓ Correct: Photosynthesis ONLY happens during the day (needs light), but respiration happens 24/7.
Mistake 4: Forgetting That All Stomata Are NOT on Lower Surface
✓ Correct: MOST stomata are on the lower surface in typical land plants, but not all.
Mistake 5: Saying Temperature “Kills” Enzymes
✓ Correct: High temperature “denatures” enzymes (changes their shape permanently).
Mistake 6: Confusing Chlorophyll with Chloroplasts
✓ Correct:
- Chloroplast = organelle (structure)
- Chlorophyll = pigment (molecule inside chloroplasts)
Exam-Style Questions & Model Answers
Question 1: Definition & Understanding
Q: Describe photosynthesis and state the word equation. [4 marks]
Model Answer:
Photosynthesis is the process by which plants synthesize carbohydrates (1) from raw materials (carbon dioxide and water) (1) using energy from light (1).
Word equation: Carbon dioxide + water → glucose + oxygen (1)
Question 2: Leaf Structure
Q: Explain how the palisade mesophyll layer is adapted for photosynthesis. [3 marks]
Model Answer:
Palisade cells are located at the top of the leaf near the light source (1). They are tightly packed with chloroplasts (1) to maximize light absorption for photosynthesis (1).
Question 3: Limiting Factors
Q: The graph shows how light intensity affects the rate of photosynthesis. Explain the shape of the curve. [4 marks]
[Assume graph showing typical limiting factor curve]
Model Answer:
Initially, as light intensity increases, the rate of photosynthesis increases proportionally (1) because light is the limiting factor (1). After point X, the curve plateaus/levels off (1) because light is no longer the limiting factor; another factor such as carbon dioxide concentration or temperature is now limiting (1).
Question 4: Mineral Deficiency
Q: A plant’s older leaves are turning yellow. Suggest which mineral deficiency could cause this and explain your answer. [3 marks]
Model Answer:
Nitrogen deficiency (1) causes older leaves to turn yellow because nitrogen is needed to make chlorophyll (1). Nitrogen is mobile and is moved from older leaves to younger growing leaves, so the deficiency symptoms appear in older leaves first (1).
Question 5: Practical Investigation
Q: Describe how you would investigate the effect of carbon dioxide concentration on the rate of photosynthesis in pondweed. [5 marks]
Model Answer:
Place pondweed in a test tube of water with different concentrations of sodium hydrogencarbonate solution (provides CO₂) (1). Keep the pondweed at the same distance from a light source (1) and at the same temperature (1). Count the number of oxygen bubbles produced per minute for each concentration (1). Plot a graph of CO₂ concentration against rate of photosynthesis (1).
Question 6: Application
Q: Explain why farmers might use greenhouses to increase crop yields. [4 marks]
Model Answer:
Greenhouses trap heat/maintain optimum temperature for enzyme activity (1), allowing photosynthesis to occur at a faster rate (1). Some farmers pump in extra carbon dioxide (1) which increases the rate of photosynthesis until another factor becomes limiting (1).
Study Tips for Mastering Plant Nutrition
1. Create Visual Memory Aids
- Draw and label leaf structure repeatedly
- Color-code different structures (e.g., green for palisade, blue for stomata)
- Create flashcards with diagrams on one side, labels on the other
2. Use Mnemonics
- CLOG: Carbon dioxide + water → Light energy → Oxygen + Glucose
- NPK: Nitrogen for greeN leaves; Phosphorus for purPle tints; Kalium (potassium) for leaf edges
3. Practice Graph Interpretation
- Find past papers with limiting factor graphs
- Practice explaining plateaus
- Identify which factors are limiting in different sections
4. Make Connections
- Link photosynthesis to respiration (opposites)
- Connect leaf structure to function (WHY is it designed that way?)
- Think about real-world applications (farming, greenhouses)
5. Test Yourself Regularly
- Don’t just read-actively recall information
- Use the “Feynman Technique”: Explain concepts as if teaching someone else
- If you can’t explain it simply, you don’t understand it well enough!
6. Time Management in Exams
- Read questions carefully-especially “describe,” “explain,” “suggest”
- Use the mark allocation as a guide (4 marks = 4 distinct points)
- Always refer back to the question to ensure you’ve answered what was asked
Test Yourself – Quick Quiz
Before you finish, try answering these questions without looking back:
- What are the raw materials for photosynthesis?
- Which layer of the leaf contains the most chloroplasts?
- Name three limiting factors of photosynthesis.
- What mineral deficiency causes yellow leaves?
- Why are most stomata on the lower surface of leaves?
- What happens to enzymes when temperature gets too high?
- Give three uses of glucose in plants.
- What color does iodine turn in the presence of starch?
Answers: (1) Carbon dioxide and water (2) Palisade mesophyll (3) Light intensity, CO₂ concentration, temperature (4) Nitrogen or magnesium (5) Reduces water loss by evaporation (6) They denature/change shape permanently (7) Respiration, stored as starch, making cellulose/proteins/fats (8) Blue-black
Next Steps & Related Topics
Congratulations! You’ve now mastered one of the most important topics in IGCSE Biology. Plant nutrition connects to so many other areas of your syllabus:
Connect Your Learning:
- Topic 7: Human Nutrition – Compare how plants and humans obtain nutrients
- Topic 8: Transport in Plants – Learn how water and minerals move through plants
- Topic 12: Respiration – Understand how plants use the glucose they make
- Topic 18: Organisms and Environment – See how photosynthesis fits into food chains and ecosystems
Final Words of Encouragement
Plant nutrition might seem like a huge topic, but remember-you don’t need to memorize everything word-for-word. Understanding the concepts and being able to explain them in your own words is far more valuable than rote memorization.
Every time you see a green plant, remember that it’s performing an incredible chemical miracle-converting light into food, releasing oxygen we breathe, and forming the foundation of almost every food chain on Earth. Pretty amazing, right?
You’ve got this! With consistent practice, active revision, and understanding (not just memorizing), you’ll not only ace your IGCSE exam but also develop a deeper appreciation for the natural world.
Remember: Biology isn’t just about passing exams-it’s about understanding the living world around you. The knowledge you gain here will serve you well beyond your IGCSE certificate.
Additional Resources
For More Practice:
- Cambridge IGCSE Biology Past Papers (0610)
- Save My Exams (savemyexams.com) – Free revision notes and questions
- Physics and Maths Tutor (PMT) – Past papers organized by topic
- BBC Bitesize GCSE Biology – Interactive activities
For Deeper Understanding:
- YouTube channels: “Cognito” and “Science with Hazel”
- Interactive simulations on PhET Colorado (photosynthesis lab)
- Real-world documentaries: “The Private Life of Plants” by David Attenborough
For Exam Technique:
- Download mark schemes-see exactly what examiners want
- Join online study groups (Reddit: r/IGCSE)
- Ask your teacher for feedback on practice answers
One Last Thing…
If you found this guide helpful, practice what you’ve learned by explaining it to someone else. Teaching is one of the best ways to solidify your own understanding. Whether it’s a friend, family member, or even your pet, try explaining photosynthesis in simple terms-you’ll be amazed at how much clearer it becomes in your own mind!
Good luck with your studies, and may all your leaves be green and healthy!
Recommended –
1 thought on “IGCSE (Cambridge) Biology Topic 6: Plant Nutrition | Your Complete Study Guide”